

Classic bread and butter: The kick and glide
CROSS COUNTRY SKIING
BY JOE HAGGENMILLER AND CHARLIE DEE
Charlie Dee: Last winter, Joe, we wrote about using the “Shuffle Stride” gear for classic skiing the Birkie and got great feedback from folks about how useful it was. That article was in the February 2018, edition of Silent Sports.
Joe Haggenmiller: Glad we helped some skiers. We also promised to go systematically through all five classic gears.
CD: This month let’s cover the gear all skiers start with, the diagonal stride. In the future, we’ll discuss the kick-double-pole, double-pole and herringbone.
JH: I often call it the kick and glide. After all, your skis are not diagonal. instead, they’re parallel, either in tracks where they exist, or shoulder width apart where there are no tracks or the tracks are too icy.
CD: I learned long ago that anybody can classic ski on moderate terrain with tracks. Jim McCarthy, my office mate, was very overweight, never exercised, but when he found out I was a Nordic skier, he suggested a weekend up north. He and his wife, Helen, had been skiing for decades. They simply got in the tracks on the flattest trail possible, shuffled along ski-to-ski, poling one arm at a time and moved forward very slowly. After an hour or so, they were ready for a long cocktail hour.
Once a skier is as comfortable with classic as Jim and Helen but wants to take on more challenging terrain or go faster, what should he or she do, Joe?
JH: To improve, take several lessons from a professional coach, start thinking about improving techniques, follow better skiers while trying to mimic their rhythm and motions and analyze video of yourself. If someone really wants to get better, I recommend they do all of these.
I start the coaching process by asking skiers to break down basic classic into four stages: kicking, gliding, pole initiation and recovery. Then we work on one stage at a time over a few sessions until the skier puts it all together.
CD: Like every other gear in skiing, I assume we start with a basic athletic stance – knees slightly bent, back in a soft “C” shape with shoulders slightly rounded and relaxed?
JH: Being relaxed is crucial. Quite often during lessons, students tense up a bit. It’s important to stay loose and start with the attitude that you’re not going to pick this up instantly, you’re not being judged and that quite often the move we’re working on will click-in sometime after the lesson.
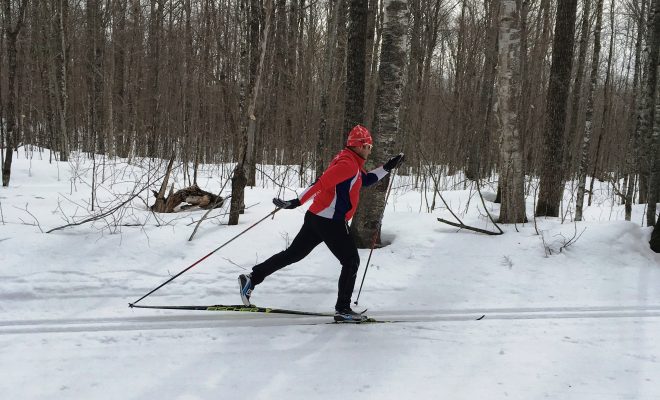
Kick phase
The kick phase begins with the skier’s body coiled like a spring. So if you’re kicking with your right ski, your right knee will quickly compress as your body weight sinks on the kicking ski, setting your wax (or fish scales if you’re on waxless skis) and preparing you to propel forward.
CD: But unlike the way I used to classic ski, folks should not pound their feet — or the ski – into the snow. One of the best lessons I ever learned was to set wax not with the entire foot, but with the ball of the foot, rolling off the toes to finish the kick. What is the upper body doing during this phase?
JH: Yes, rolling off the ball of your foot is key. Once you sink, the kick should be a quick, snappy kick straightening your kicking leg. If you’re kicking with the right ski, then you should have an equally quick, powerful poling-motion with the left pole. Of course, you are in constant motion, so when you initiate the kick with your right foot, your left pole is in the snow, pushing backward; then as you complete the kick and transfer your weight to your left foot, it is possible both poles will be off the ground before the right pole hits the snow. We’ll get into more details on poling in a few minutes.
Load Shakira for the glide phase
CD: I’ve worked the past couple of years on improving my kick phase, but as you pointed out, I have some glaring weaknesses in what comes next, the glide phase. This is where we transfer weight, in this case, from the right, or kicking ski, to the left, the gliding ski.
JH: There are a couple of things you can do to make your weight transfer more compete and extend your glide, Charlie. The glide phase has its origin during the kick phase, since as you kick with the right, your left thigh, hinged at the hip, should be firing and driving your left ski forward – off the snow. As you transfer your weight to the left ski, you want the entire frame of your body over that left ski.
CD: I know that the femur, or thigh bone, is the longest and strongest bone in the body. So I’ve been focusing on driving my thigh forward with the un-weighted ski.
JH: Right. Your problem isn’t the initiation of the hip and thigh driving forward; rather, it’s that you’re not keeping your full body weight over the ski long enough, so you don’t glide as much as you’re capable of. To be honest, it looks like you haven’t watched enough Shakira videos.
CD: I plead guilty.
JH: When I ski behind you, your butt is hardly moving from one side to the other. When you glide on your left ski, your left hip should be rotating slightly toward the center. If you were doing that, I’d see your butt moving to the left. Adding more hip-action will center the core of your body over the left ski, extending your glide.
CD: How do I achieve that?
JH: Since we don’t have WIFI here on the trail, I can’t show you Shakira, but dial her up at home. Now, get out of the tracks, bend your knees, and shake your hips back and forth without rotating your upper body. See, you’re capable of it. You should do this every time you ski to remind your brain that your hips can actually move and you don’t have to stay locked in.
CD: Skiing with that slight hip rotation feels much different even though the rotation is very slight.
JH: That’s right. Don’t over-correct by twisting your shoulders. Your hips are still moving forward but they’re also rotating slightly. It’ll take a while before you get into muscle memory.
Dorsiflexed ankle
CD: The other key to gliding that you keep mentioning is a dorsiflexed ankle. What the heck is that?
JH: This refers to the angle between the sole of your foot and the shin-bone. It should be acute, less than 90 degrees. See, most people can glide much further than they do. Flexing forward on the ankle allows the knee to power towards the tip of your ski, extending your glide.
You can prove this to yourself by standing stationary in classic tracks with your knees slightly bent but your sole-to-shin-bone at a 90-degree angle. Now allow your hips to lean your upper body slightly forward: your ankles will flex and your skis will move forward.
CD: Practicing this, it’s clear that I can’t drive my knee forward to extend the glide unless I can flex my ankle. This gives me another skill to work on. Let’s move to poling.
Pole-initiation phase
JH: While gliding on the left ski, your right arm and shoulder are swinging forward, preparing to pole. The key here is to think about the right elbow swinging forward, past the hip.
CD: So instead of reaching with my hand, as we were taught decades ago, we’re reaching with the elbow. The old days of posing for pretty pictures with the arm extended and the elbow almost straight are long gone.
JH: Well, the evolution of better poles and skis coupled with shorter wax pockets have resulted in technique changes. We now want the right hand to swing high with the elbow thrusting forward but not straightened: it should remain around 90 degrees, less on steeper climbs, a little more on easier terrain.
CD: The other benefit of leading with the elbow is that this allows the upper body to open up a bit so that the abdominal muscles can be involved in the pole plant. The right pole hits the snow, not straight up and down, but at an angle, with the hand further down the trail than the tip. Of course, the steeper the hill, the shorter the angle.
Recovery phase
JH: Now we’re in the recovery phase. While you’re gliding on your left ski and your right arm is poling, your right ski is recovering from the kick that started all this. That right ski should be off the ground and back, counter-balancing the rest of body leaning forward. I like to see the tail of the ski at least 4-6 inches off the ground.
CD: But again, this will come naturally if we’re kicking and transferring weight. You don’t want beginners trying to measure how far off the ground their recovery ski is.
JH: No, and we don’t want people trying to kick their recovering foot up near their butt like in the old days. A better measure of this dynamic is that at the moment you plant the right pole in the snow, your left leg should be in front of your right, and imagining a protractor, I like to see at least a 40-degree angle between the left and right femurs.
CD: Nobody on skis is going to look down to see what the angle is between their thighs, Joe.
JH: No, but everybody has a friend with a cell phone who can stand at the side and take a video. The reason that a 40-percent angle is so important when you’re poling on the right is that it’s a test of whether or not you’re next stroke will have any power to it.
CD: That makes sense because the power comes from the recovering leg thrusting forward at the hip. If there’s less than a 40-degree angle between the legs, there won’t be enough separation to achieve that power.
JH: Now when you put all these pieces together, Charlie, your striding rhythm will be different. When you rotate your hips and flex more at the ankle, you’ll glide longer. That means you will delay your pole plant longer than you did previously. Over the course of 10k, you’ll use a lot fewer strokes, and thus become a more efficient class skier.
CD: And I’ve discovered Shakira. Thanks for both.