For Cycling Success, it’s not Just About the Legs
Addressing Shoulder Girdle Pain and Discomfort
By Kierstin Kloeckner
Editor’s Note: It’s likely impossible to find anyone more passionate about silent sports than Kierstin Kloeckner. And it’s not just in the doing; it’s in the doing and teaching it right, and safely. A former bike racer, now bike commuter, a personal trainer and Yoga/Pilates instructor in Madison, WI, you’ll want to check out this story to help cyclists prevent and relieve shoulder girdle pain.
For cyclists, which muscles come to mind as the most important to focus on? The quadriceps? The glutes? The core? Yes, to all! But, as a personal trainer for twenty-seven years and a cycling coach and former racer, I must also add the muscles around the shoulder girdle. These muscles, many tiny, and not what many would consider beneficial, actually hold the entire upper body in a somewhat proper posture on the bike and help prevent a sore neck, pain between the shoulder blades, or, worse yet, rotator cuff tears.
Let’s be honest, cycling is not the best for posture. We cyclists love to round our upper backs, allow our shoulders to drop toward the ground, and arch our necks as we look ahead. Also, many of us have desk jobs, sit far too much on the couch and in the car, and rarely do shoulder girdle strengtheners. The result? We are all ticking time bombs for injury or, at minimum, discomfort.
Here’s the good news: Five to ten minutes of exercises and stretches several times per week, along with practicing good posture while seated (yes, I’m calling you out while you read this article in a slouched position!) at least part of the time, can make an enormous difference!
Before I take you step-by-step through these simple exercises, I want you to find a full-length mirror. Stand in front of it with somewhat form-fitting clothes on. Try to stand in a relaxed fashion. Now, look at yourself head-on. Notice if one shoulder is higher than the other, or if both gravitate toward your ears. Next, turn to the side and look at your upper back, shoulders, and neck. Is your upper back overly rounded? Do your shoulders roll forward? Does your chin protrude forward or does the back of your neck have excessive curvature? If you said yes to any of these, you need these exercises.
Although the strengtheners can be done anytime throughout the day, the two stretches should be done when you are warm; post-shower or post-exercise is best. I’ll start with the stretches so you are able to notice abnormal tightness or discrepancies between the left and right side.
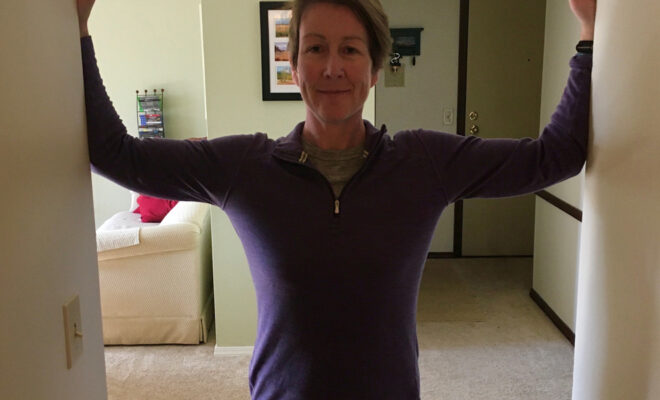
Door Jamb Stretch

Fig. 1: Contributor Kierston Kloeckner demonstrates the Door Jamb Stretch. All photos courtesy of Kierstin Kloeckner.
Stand in the center of an opened door frame. Place your forearms on the door frame so your arms are roughly at a right angle. Now slide your shoulder blades down your back, away from your ears, and roll your shoulders back to open your chest. If this feels like a stretch, stop there. If you need more of a stretch, and please stop at the first sign of pain, take a small step forward. Hold this stretch for sixty seconds one to two times daily.
Wall Washers
Stand with your back on a bare wall. Try to find your best posture. Your feet can be slightly away from the wall. Lengthen the back of your neck and slowly raise your arms to form a “goal post” position with your palms and forearms facing forward and your hands roughly ear height. Now, while keeping your chest as open as possible, begin to raise your arms above your head while keeping your shoulders away from your ears. Slide your arms up and down ten to fifteen times daily. As your chest and shoulders become more flexible, this should become easier.
The following strengtheners should be done three times weekly, on non-consecutive days. Each exercise is to be performed ten to fifteen repetitions twice with a 45-to-60-second rest in between sets. Again, stop immediately if there is any pain.
Rows with Exercise Band
A band with handles works best. However, you can wrap your hands around a band without handles if need be. Loop the band around any pole or post, or lock it in a door jamb. This can be done one arm at a time or both arms at once, depending on how you feel or if you have an injury on one side. Stand tall with your chest open and “proud.” Hold on to one or both handles with your thumb facing up (palm side facing in) and your arm at a right angle by your side. First, before pulling back on the band, pinch your shoulder blades together slightly as if they were elevator doors closing. Then, slowly draw your arm back but focus more on drawing your shoulder blades together versus pulling back with your elbow. Refrain from pulling so far back that your shoulder rolls forward.
Internal and External Rotator Cuff Strengtheners
With the band looped around a post so only one handle is free, and the band is roughly torso height when extended, face one side of your body with your hip towards the post. Grab the handle first with the outside facing hand (this will be your external rotator). Lock your elbow into your side at a right angle and roll your shoulders back. Slowly, with your elbow and upper arm always locked to your torso, pull the band outwards away from the post in a “hinge” motion. If you don’t feel fatigue set in to your shoulder deeply within eight reps, you need to take a small step away from the post.
Next, for the internal rotator, switch the band to the other hand. You will need to take a step away from the post. Have this arm in the exact same position, but now rotate inwards towards the midline of the body in a “hinge” motion. This muscle is often stronger so you may not feel fatigue as quickly.
Locust
Finally, I’m using one of my favorite yoga positions I teach. This exercise/pose not only strengthens the shoulder girdle, but also the entire spine, glutes, and hamstrings, and opens the front side of the body.
Lie on the floor (not on a bed) or a hard surface on your belly. Place your arms at your sides with your palms facing upwards. Lengthen your spine as much as you can. Without looking up and out (keep your chin slightly tucked towards your chest), while still focusing on lengthening the spine versus lifting it, squeeze your shoulder blades together so your upper body moves off the floor a little bit. Now, squeeze your glutes and draw your lower belly in. See if you can raise or lighten your legs off the floor. Don’t worry about lifting your hands off the floor; it’s fine if they come up, but squeezing the shoulders is far more important. Repeat this lifting and lowering slowly ten to fifteen times.
As with any exercise routine, it takes time for your body to adjust and get used to new movement. Be kind to yourself and never push beyond comfort. If anything hurts, end the movement immediately.
If you stick with this routine, along with small posture checks during the day while seated and standing, within weeks you should notice a big difference in not only in your overall posture, but also how your upper body feels on the bike. I have found these strengtheners to be especially beneficial in cross winds and I hope you do too!
* * *
Please scroll (all the way!) down to post your comments.
Thank you!


