

Prepping For The Long Haul
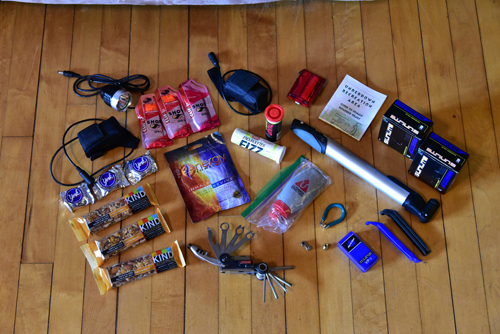

A good sample of the kinds of items the author is discusses to bring on a long self-supported ride. Clockwise from top on the outer layer are: extra battery; taillight; map; two tubes; pump; tire levers; patch kit; presta/Shrader valve conversion; master link; multi tool (this one includes a chain break, but you may need to purchase one separately); nut bars; candy; battery and light; and gels. Clockwise from top for the inner circle: electrolyte tabs for water bottles; real maple syrup in gel bottle; spoke wrench; and energy towel.
By Kierstin Kloeckner
In this day and age when just about everyone has completed – or knows someone who has completed – a marathon, century or triathlon, long distance sports no longer shock and awe. Athletes are doing longer and crazier things all the time… sometimes without being properly prepared.
In my circle of friends, the chosen long-distance activity is often gravel riding, bike packing or adventure cycling. These events or activities range from a long day in the saddle to multi-day or week-long sojourns, oftentimes in remote places where being unprepared could spell an awfully long walk to any help. Have you ever walked for miles in cycling shoes pushing a mud-coated bike? It’s not fun, trust me, so I thought I’d give you a few basics to help prevent this from happening if you’re just getting into this cycling world.
First, and I know this may seem ridiculously basic, but train and know your body. I’m not just talking about pumping out miles and miles. I’m talking about pumping out those miles on the bike/saddle you’ll be using for your adventure (training on a light carbon road bike when you’ll be doing the event on a heavier touring or cross bike isn’t the best idea). Figure out how to fuel yourself without getting GI distress, how far you can push without bonking and how much water you need in different conditions. It’s these little things that can make so much difference on a 100+ mile gravel ride.
Bring extra food and water and on wilderness rides, pack iodine tablets or a water filter. I tell folks over and over again, bring enough to sustain you through 50% more of what you’re riding, which means if you’re doing 100 miles, pack for 150. You will get lost at some point on a ride sometime, or a convenience store you thought would be open won’t be for some reason. If you have to, knock on someone’s door and ask for water, but use this only in emergency situations. There is a reason why most long distance adventure races make you finish with 3,500 calories in your pack—they don’t want to lose folks out on course. Dehydration and lack of fuel affects your brain more than you know.
Choose your clothes wisely. A seam on a pair of shorts that doesn’t cut into your skin on a fifty-mile ride can make for one heck of a bloody, painful mess on a 200-mile ride. Listen to your feet. Are there any hot spots caused by your sock and shoe choice? Do your feet feel fatigued or in pain at the end of a long training ride? I, personally, have been brought down to my knees with only four remaining miles of a gravel ride because my touring shoes were a bit too broken in and soft which resulted in searing nerve pain in the balls of my feet. Essentially, train in the clothes you plan on bringing on your adventure and NEVER buy anything new just before an event without testing it several times.
Learn basic bike maintenance. The more remote you are, the less chance of getting help. Folks who own summer cabins on far Northern lakes rarely know how to fix a broken chain, a broken spoke or patch a tire with a slit in its sidewall. For that matter, even if you start out with a group, plan for the worst. What if they all drop you? Or what if you get sick and have to stay back? Can you take care of yourself out there? Bike shops will often offer basic maintenance courses to teach you how to at least repair chains and tires—as far as spokes go, I tend to check all of mine before a ride, opt to ride heavier wheels with a larger spoke count and just pray for the best.
Which spare parts and tools you bring is up to you, but again, the further out there you are, the less likely someone will be able to help. I know guys who bring a spare foldable tire with them on 100-mile gravel events. Although I don’t do that, I do always carry something to boot (an old piece of tire or folded over duct tape is my choice) my tire with in case a sharp rock gashes the tire. It’s not perfect but my hope is it will at least gimp me back to a busy road or my car. For any gravel event, I always carry two new tubes and a patch kit. I’ve seen folks get several flats on one ride so this isn’t a place to cut back on weight. Many of my friends use tubulars as well. Aside from the tubes and boot, I always pack a pump because too much can go wrong with CO2 canisters (although carrying both isn’t a bad idea). I was on two rides last year where riders either had faulty canisters or they didn’t have enough and were without a pump. Having enough tubes doesn’t help if you don’t have a way to inflate them.
I just started carrying a chain tool and master link. They’re light and priceless. Just prior to the start (at least it was at the start) of a night gravel event last year, a guy was walking around with a broken chain asking if anyone had either; that’s when I bit the bullet and started carrying one of each of my own.
Finally, doing a quick inspection of your entire bike prior to any event is so important. A loose quick release could spell disaster on the first bumpy trail or hill you hit. It doesn’t take long to check bolts (many of mine came loose on the Tuscobia trail two years ago from all the baby heads and I didn’t realize it until the end of the ride).
If you’re getting into bike packing, there are wonderful resources out there that will teach you about lightweight, yet sturdy panniers, trailers, tents/bivvys, stoves, etc. I also suggest if you plan on trying this out, to talk to someone who has been out there. Ask them questions about why they may prefer a B.O.B trailer to panniers or why they pack a tent versus just a hammock. Listen to them and compare it to what type of trip you want to do or how you like to live to find the best fit. Some folks are happy living off energy bars and trail mix for a week, while others want semi-gourmet dinners on trail. Figuring out where you fall in this spectrum can make or break your experience.
To end, I can’t stress enough the importance of learning to read (and carry) a map. I’m absolutely floored by how many people show up to gravel events with only their Garmin or smartphone. So many of the areas where these events are held don’t have cell reception and we all know how electronics only work perfectly when we don’t really need them. Garmins die, fall off bikes and are really hard to read if you’re completely off course because you followed another person who didn’t know where they were going (I see this all the time). Print a paper cue sheet and have it in a waterproof map case or baggy with a map of not only the course but also several miles around the course (this also helps if you need to make an emergency ditch to the nearest town or paved road). Learn how to count roads since many low maintenance roads don’t have signs marking them. I often study my map and the course quite a bit and make mental notes of “turn right after crossing creek.” It also helps to read tracks. Seeing others’ tire tracks in gravel dust can sometimes tell you if you’re on the correct road. Remember, if you’re getting a map of the area, often “B” roads and gravel roads aren’t on DOT maps. Gazetteer maps are often my “go-to” since they show even the small logging roads.
So there it is, my basic guide. I know this isn’t fancy, but these are all things I was either taught or figured out because of my own mistakes. Now get out there and enjoy some remote riding!